Add a domain
Custom domains must be added to an environment’s VIP Dashboard in order to be used for launching a site or sending emails from an environment with that domain.
After adding a custom domain, the domain must also be verified before DNS settings can be provided and a Let’s Encrypt certificate can be installed.
Access
Prerequisites
To add a domain to an application’s environment, a user must have at minimum an Org member role or an App write role for that application.
Domains have specific application and environment associations.
- Navigate to the VIP Dashboard for the application that the domain should be associated with.
- Select the environment that the new domain will point to (e.g., production, develop) from the dropdown located at the upper left of the dashboard.
- Select “Domains & TLS” from the sidebar navigation at the left of the screen.
Add a domain
Note
A domain can only be mapped to a single application. It must be removed before it can be used on another application.
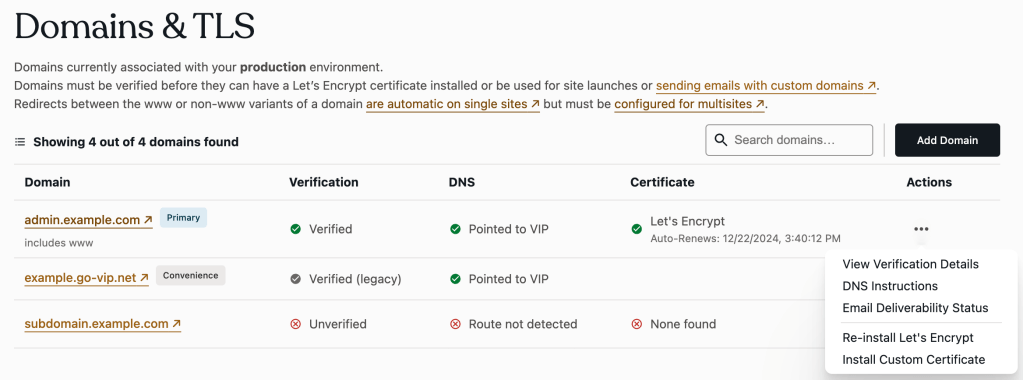
Within the “Domains & TLS” panel of an environment’s VIP Dashboard:
- Select the button labeled “Add Domain” located in the upper right of the panel.
- Enter the desired
wwwor non-wwwversion of the domain into the available field. The version entered in this field is the fully qualified domain name (FQDN) that will be used for any associated site launches. - Select the button labeled “Add“.
Within 10 minutes the added domain will appear in the list of domains associated with the environment.
After a domain has been added, the domain must be verified before DNS instructions can be accessed and before a Let’s Encrypt certificate can be installed. Only verified domains can be used for launching a site or sending emails.
Remove a domain
Remove a domain only after confirming that the domain is no longer being used to route public traffic to a site on the environment, and it is not being used to send emails from the environment.
Within the “Domains & TLS” panel of an environment’s VIP Dashboard:
- Select the “•••” button located to the right of the domain.
- Select “Remove” from the overflow menu.
- Select the button labeled “Confirm” to complete the removal.
Remove a primary domain
A domain cannot be removed from the VIP Dashboard if it is currently assigned as the environment’s primary domain. By replacing the current primary domain with a different custom domain, it will become eligible for removal.
- On a WordPress multisite environment, the primary domain assigned to the main site (ID 1) can be updated in the launch tooling in the Network Sites panel of the VIP Dashboard.
- On a WordPress single site environment, the primary domain must be updated by submitting a VIP Support request.
Last updated: March 27, 2026