VIP Authentication
VIP Authentication enables users to log in to the VIP Dashboard securely, by signing in with their GitHub or WordPress.com user account and verifying their identity with a preferred multi-factor authentication (MFA) method.
VIP Authentication is not required for users who sign in to the VIP Dashboard with SSO.
Prerequisites
- A user must already have a VIP Dashboard user account, or receive and accept an invitation to the VIP Dashboard.
- A user must have either a GitHub or WordPress.com user account that is associated with the same email address to which the VIP Dashboard invitation is sent.
Set up an MFA method for VIP Authentication
The first time a user signs in to the VIP Dashboard with either GitHub or WordPress.com, they will be prompted to configure an MFA method in a panel titled “Keep Your Account Safe“. At least one MFA method must be configured in order for a user to verify their identity and gain access to the VIP Dashboard.
- Select one of the three MFA method options: Passkeys, Authenticator App, or SMS.
- Follow the prompts on the next screen to complete the configuration of the selected method.
- Print out or copy and securely store the full set of backup recovery codes provided on the final screen. Backup recovery codes enable a user to regain access to their VIP Dashboard account in the event that they do not have access to any of their configured MFA methods (e.g. a lost phone).
Manage MFA methods
Users who sign in with GitHub.com or WordPress.com can access the panel for managing their MFA methods and preferences from the Settings panel of the VIP Dashboard.
Options for MFA methods and preferences are not available for users who sign in to the VIP Dashboard with SSO.
After a user has configured at least one MFA method and has generated and stored a set of backup codes, they can add, edit, or configure other methods to verify their identity and access the VIP Dashboard.
Configuring more than one MFA method ensures that a user will have the ability to access the VIP Dashboard even if they lose access to their primary MFA method. MFA methods that have been successfully configured for a user—including generated backup codes for account recovery—are indicated by a label with the text “Configured” in the “Multi-Factor Authentication” section of the Settings panel in the VIP Dashboard.
To access the “Multi-Factor Authentication” management panel:
- Log in to the VIP Dashboard.
- Select the avatar in the upper right corner of the VIP Dashboard, then select “Settings” from the dropdown menu.
- In the section titled “Authentication”, select the button labeled “Manage MFA“.
Preferred MFA Method
If more than one MFA method is configured, a user can select which of those methods is preferred and should be the default.
In the section labeled “Preferred MFA Method” located at the top of the panel:
- Select the dropdown to display the list of options.
- Select the preferred MFA method from the dropdown list.
The selected MFA method will be automatically saved as the preferred MFA method.

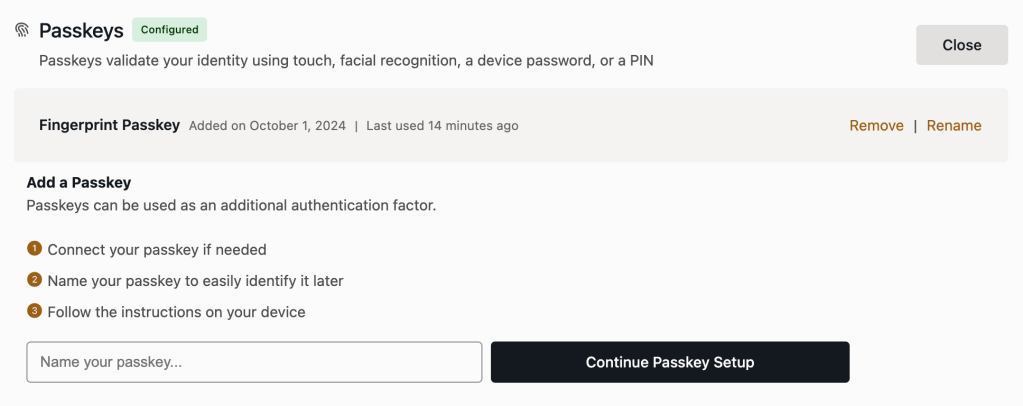
Passkeys
Passkeys are the recommended MFA method option for VIP Dashboard user accounts. Passkeys are a digital credential for authentication using a device’s biometric authentication like a fingerprint or facial scan. Passkeys are very secure, and allow authentication with devices like YubiKeys, or a phone.
Add a Passkey
In the section titled “Passkeys”, to configure a new passkey:
- Select the button labeled “+ Add“. If a passkey already exists, the button is labeled “+ Add another passkey“.
- In the field below the section titled “Add a Passkey”, type in a descriptive name for the new passkey.
- Select the button labeled “Continue Passkey Setup“.
- Follow the prompts on the user’s current device.
Manage passkeys
For each passkey method that is already configured, a user can:
- Select the linked text “Remove” to delete a passkey.
- Review the date the passkey was added and the date it was last used.
- Select the linked text “Rename” to update the descriptive name for a passkey.
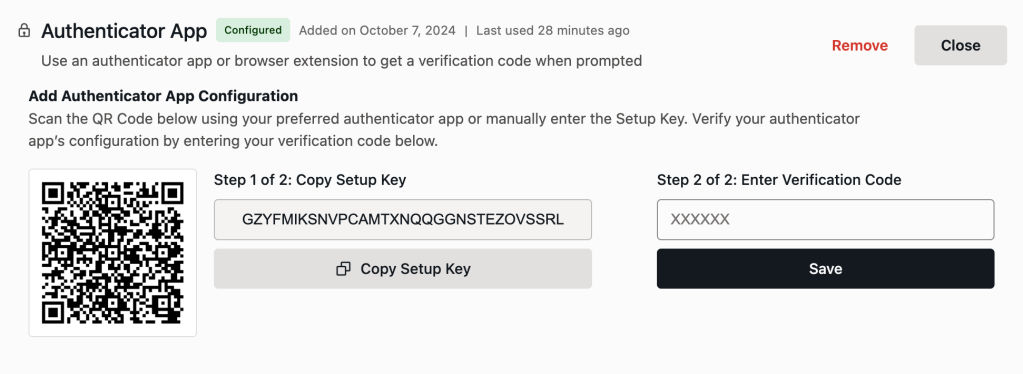
Authenticator App
An authenticator app is a mobile application that generates one-time passwords to help verify a user’s identity (e.g. Authy or Google Authenticator). One-time passcodes generated for VIP Authentication are labeled “VIP Authentication” in an authenticator app when it is successfully configured.
Add Authenticator App Configuration
In the section titled “Authenticator App”:
- Select the button labeled “+ Add“.
- In the section titled “Add Authenticator App Configuration”, either:
- Scan the provided QR code with a mobile device or
- Copy the provided setup key by selecting the button labeled “Copy Setup Key” and use it to create a new account entry by following the instructions for that mobile application.
- Retrieve the one-time passcode labeled “VIP Authentication” from the mobile app.
- Enter the code in the field labeled “Step 2 of 2: Enter Verification Code“.
- Select the button labeled “Save“.
Note
For users who previously configured VIP Cloud Authentication in an authenticator app, the entry labeled “VIP Cloud” can be removed after the new entry labeled “VIP Authentication” has been successfully configured.
Manage an authenticator app method
For each authenticator app method that is already configured, a user can:
- Review the date the authenticator app method was added and the date it was last used.
- Select the linked text “Remove” to delete an authenticator app method.
- Select the linked text “Edit” to repeat the setup steps for the authenticator app method (e.g. configure a new mobile device or app).
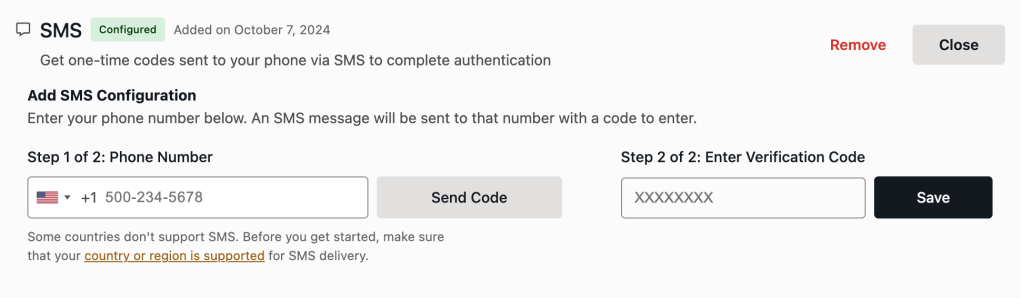
SMS
The SMS MFA method option sends one-time passcodes to a user’s phone. The SMS MFA method is less secure than passkeys and authenticator app MFA methods.
Add SMS Configuration
In the section titled “SMS”:
- Select the button labeled “+ Add“.
- In the field labeled “Step 1 of 2: Phone Number” type in the phone number for the user’s mobile device. Update the country code by selecting the icon labeled “Selected country” and typing the name of the relevant country in the search field.
- Select the button labeled “Send Code“.
- Retrieve the one-time passcode sent to the mobile device and enter the value in the field labeled “Step 2 of 2: Enter Verification Code“.
Manage SMS
If an SMS method is already configured, a user can:
- Review the date the SMS method was added and the date it was last used.
- Select the linked text “Remove” to delete an SMS method.
- Select the linked text “Edit” to repeat the setup steps for the SMS method (e.g. configure for a new mobile device).
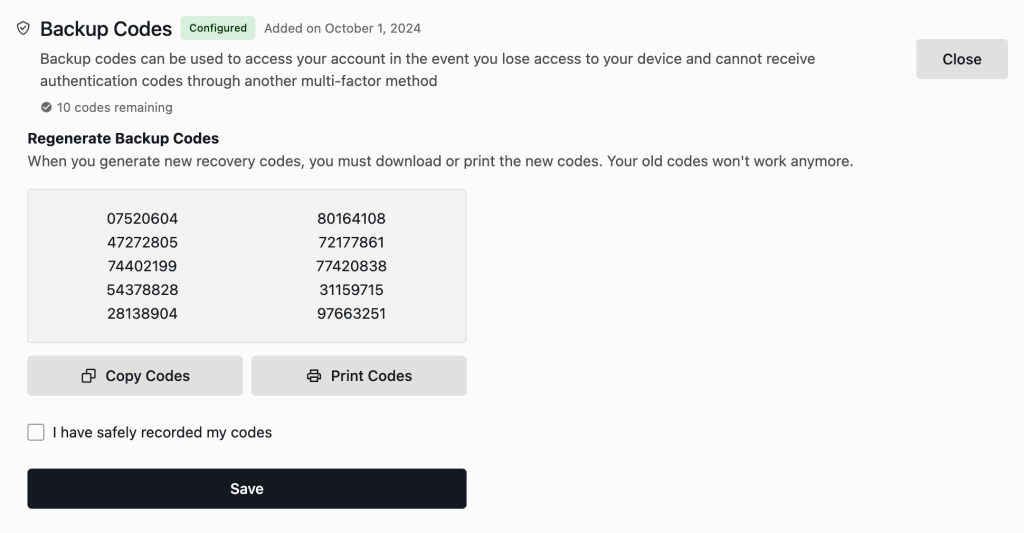
Backup Codes
Backup codes enable a user to regain access to the VIP Dashboard if they do not have access to any of their configured MFA methods (e.g. a lost phone). Backup recovery codes should be stored securely, for example in a password management application or printing out the codes and storing them in a secure location.
Manage Backup Codes
If backup codes were previously generated, a user can:
- Review the date that the backup codes were last generated.
- Review the quantity of remaining backup codes.
- Select the linked text “Regenerate Codes” to generate a new set of 10 backup codes. Generating a new set of backup codes will automatically invalidate all previously generated backup codes.
Last updated: April 23, 2025