Point DNS for a domain to VIP
Once a site is ready to launch, the DNS for a site’s new domain must be updated with the DNS provider and pointed at VIP for the site to be publicly available at that domain.
- DNS settings for
ALIAS,ANAME, andA Recordare provided for root domains. - DNS settings for
CNAMErecords are provided for subdomains. - VIP recommends using
ALIASrecords to route DNS for root domains whenever possible.
Note
A different set of DNS records for a custom domain are required in order to send emails from a WordPress environment with the domain instead of the default email address donotreply@wpvip.com.
Access
Prerequisite
- The domain has been added to the VIP Dashboard.
- Verification for the domain has been successfully completed.
- The user has the ability to add and edit DNS records with the domain’s DNS host provider.
- If a site has a reverse proxy configuration, review the set up instructions before updating DNS for the domain.
The DNS settings for a domain are available only after a domain has been added to the VIP Dashboard and verification for the domain has been successfully completed.
Domains have specific application and environment associations.
- Navigate to the VIP Dashboard for the application that the domain is associated with.
- Select the environment that the domain will point to (e.g., production, develop) from the dropdown located at the upper left of the dashboard.
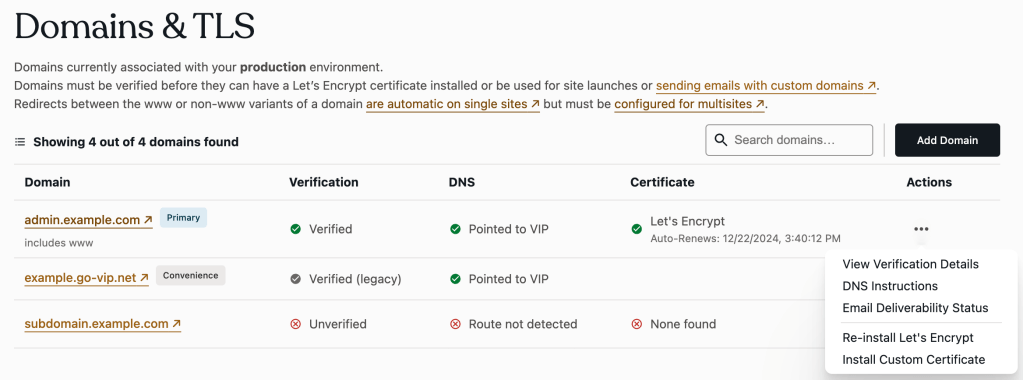
- Select “Domains & TLS” from the sidebar navigation at the left of the screen.
- Select the “•••” button located to the right of the domain.
- Select “DNS Instructions” from the overflow menu.
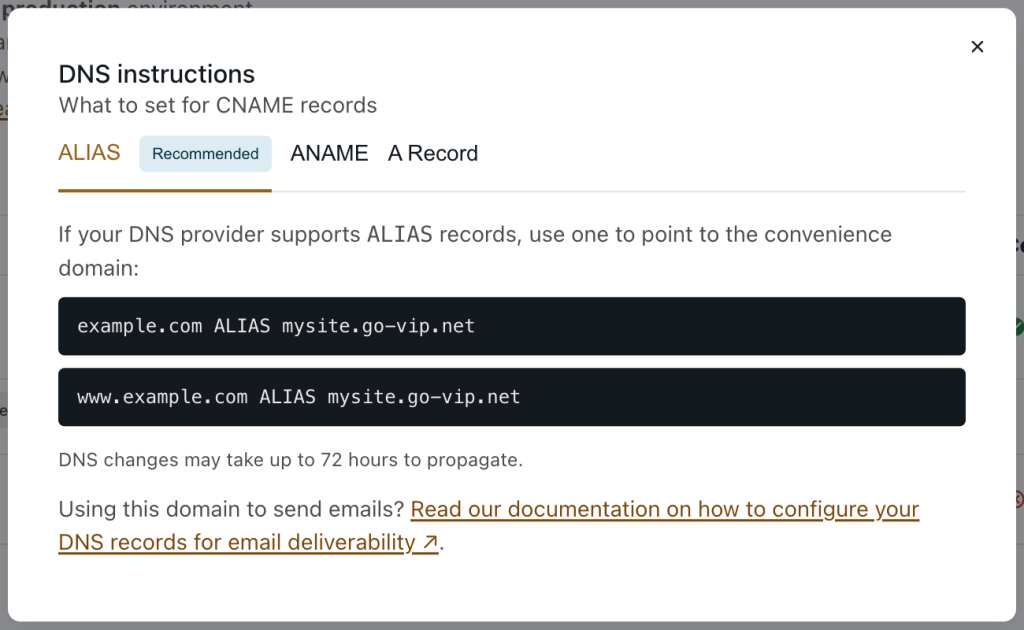
- The “Setup your DNS” panel in the VIP Dashboard provides the values to point a domain to VIP using
ALIAS,ANAME, orA Records for root domains, andCNAMErecords for subdomains. Select and copy a record value from the “Setup your DNS” panel and follow the instructions from the domain’s DNS provider to add or update a new DNS entry.
DNS propagation
Once the DNS settings for the domain have been updated with the DNS provider, the speed at which the updated DNS will fully take effect is dependent on the domain’s Time To Live (TTL). The dig command can be used to check the domain’s current DNS record TTL, and any updates to a domain’s TTL must be made with the DNS provider. DNS can take up to a full 24 hours to propagate around the world, and a service like DNS Checker can be used to track progress of propagation.
Confirm DNS settings
The status of a domain’s DNS settings are displayed in the column labeled “DNS”. If an unexpected DNS status is displayed, use the dig command to confirm the domain’s DNS settings and make sure that they match the values that were provided by VIP.
Command line
The dig <domain> command can be run in a terminal to confirm that the DNS is correctly pointed to VIP:
dig www.example.com
Output from the command will display settings for the domain’s ALIAS, ANAME, A record, or CNAME. The settings in the output should match the setting information provided for the domain in the VIP Dashboard.
VIP Dashboard
Each domain listed in the Domains panel of the VIP Dashboard will display one of the following status messages in the DNS column for the domain’s DNS settings:
- ⚠️ Unavailable: VIP’s status service is not available to respond.
- ❌ Route not detected: DNS is not pointed to VIP, and there is no route for an HTTP request. Updates to the domain’s DNS settings are needed for the domain to successfully point to VIP.
- ✅ Pointed to VIP: The domain’s DNS is successfully pointed to VIP
- ✅ Route found: The domain’s DNS is not pointed to VIP, but the
x-powered-byHTTP response header added by VIP has been detected. This indicates that there is a route for an HTTP request. This status is often returned for domains that are assigned to a site with a reverse proxy configuration.
Last updated: June 09, 2025