Invite new users
Invite new users to have access to an organization’s VIP Dashboard, and assign Org roles and App roles to them that will define the permissions they have to interact with an organization’s applications.
Note
Access to an application’s GitHub repository is not required in order to have access to the application’s VIP Dashboard. User access and permissions for an application’s GitHub repository are managed separately in the GitHub dashboard.
Access
Prerequisite
Only users with an Org admin role can invite, remove, and manage user access levels for other users in the VIP Dashboard.
If an organization currently has no users with the Org admin role, and existing users are unable to view certain features such as the organization’s Usage Plan Details, contact VIP Support for assistance.
- Navigate to the organization view of the VIP Dashboard and select the “People” option in the left-hand navigation menu.
- Select the tab labeled “Platform Access“.
Users listed in the “Platform Access” tab have already accepted an invitation and have access to the organization’s VIP Dashboard.
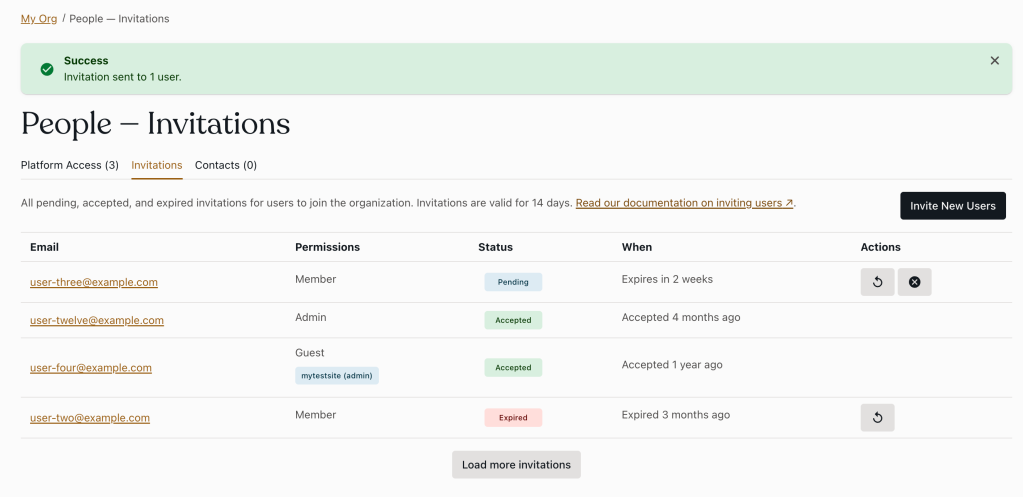
To view a list of invitations that were sent to users but were not yet accepted, select the tab labeled “Invitations“.
Invite new users
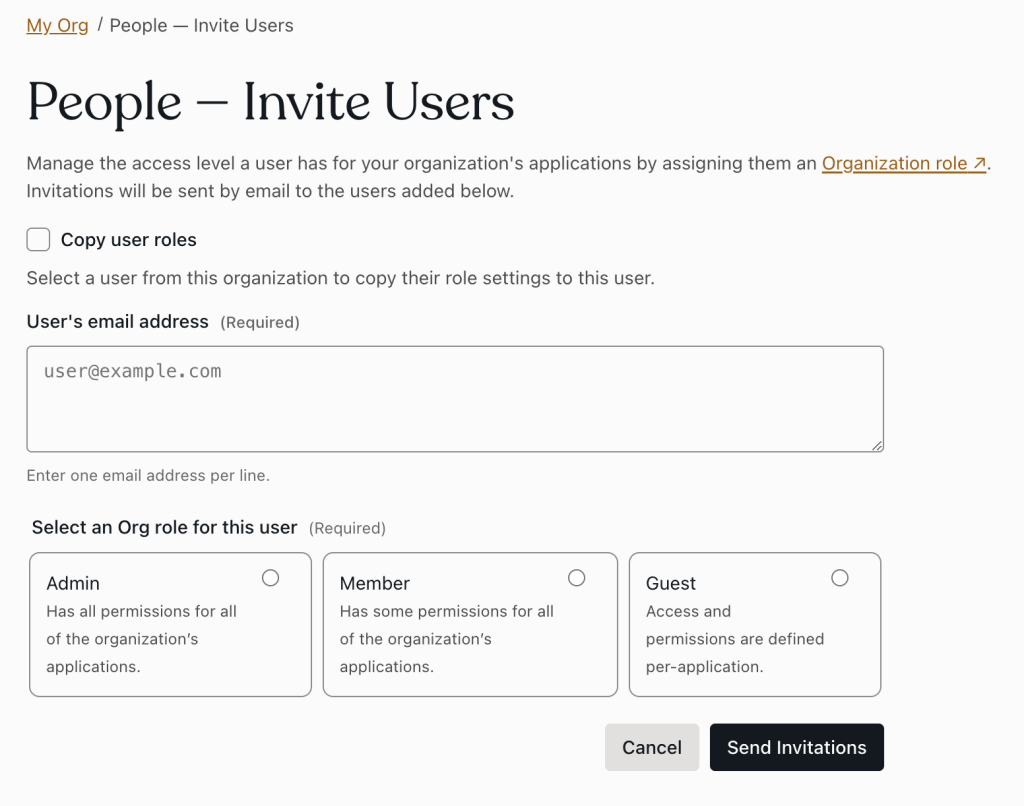
- Select the button labeled “Invite New Users” located in the upper right of the panel.
- Add up to 10 email addresses in the field labeled “User’s email address” for new team members who require access to the VIP Dashboard.
Each email address must be added to a new line in the field. - Assign the Org role that will apply to all users for this invitation in the “Permissions” section.
- Role settings can also be copied from an existing user in the organization and applied to the user being edited by selecting the option labeled “Copy user roles“.
- The Org role for an individual user can be modified later by an Org admin if needed.
- If the Org Guest role is selected for the user, options to “Configure application access” will appear below the Org role setting.
- Search for an application by name or ID in the search field.
- For each application, assign the App role that should apply to all users for this invitation in the “Allowed applications” list.
The App role for a user can be modified on a per-application basis later by an Org admin if needed.
- Select the button labeled “Send Invitations” at the bottom right of the “Invite Users” panel.
Invitations remain valid for 14 days.
The body of the invitation email sent to a user will include instructions for logging in to the VIP Dashboard.
Resend an invitation
The status of an invitation (i.e., Accepted, Pending, Canceled, Expired) is displayed in the tab labeled “Invitations” within the column labeled “Status“.
Invitations that are pending or expired can be resent.
- Navigate to the organization view of the VIP Dashboard and select the “People” option in the left-hand navigation menu.
- Select the tab labeled “Invitations“.
- If an invitation can be resent to a listed email address, a button with the hover title “Resend Invitation” will be available in the column labeled “Actions“.
- Select the “Resend Invitation” button for the user.
- Select the button labeled “Confirm” in the confirmation modal.
Cancel an invitation
If needed (e.g. if the email address was incorrect) an invitation can be canceled.
- Navigate to the organization view of the VIP Dashboard and select the “People” option in the left-hand navigation menu.
- Select the tab labeled “Invitations“.
- If an invitatio to a listed email addressn can be canceled, a button with the hover title “Cancel Invitation” will be available in the column labeled “Actions“.
- Select the “Cancel Invitation” button for the user.
- Select the button labeled “Confirm” in the confirmation modal.
Last updated: April 21, 2025