Debug with Enterprise Search Dev Tools
Enterprise Search Dev Tools is built into Enterprise Search and can be found in the WordPress admin tool bar when Enterprise Search is enabled. Enterprise Search Dev Tools is useful for debugging and testing individual queries by allowing Elasticsearch queries to be edited and run in real-time.
Access
Prerequisites
- Enterprise Search is enabled.
- Access requires a user to be logged in with a WordPress Administrator role.
The Enterprise Search Dev Tools panel is accessed by selecting the “Search: [x] queries” link in the WordPress admin tool bar.
When no longer needed, the Enterprise Search Dev Tools panel can be closed by selecting the “x” figure in the top right corner.

Search status information types
The top area of the Enterprise Search Dev Tools panel summarizes the following search status information types for the current query:
- Rate limited?: Whether search is currently being rate limited
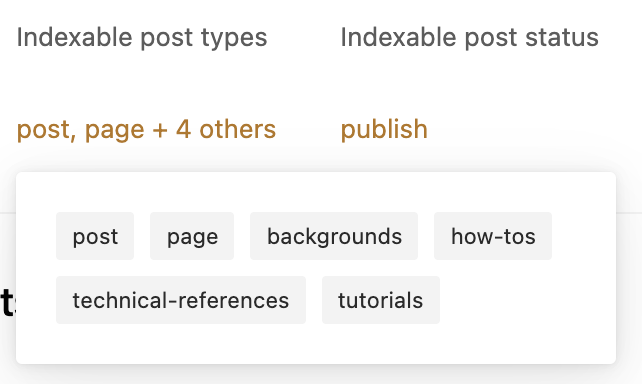
- Indexable post types: Which post types are being indexed
- Indexable post status: Which post statuses are indexable (defaults to Publish)
- Meta Key Allow List: Which post meta keys are being indexed
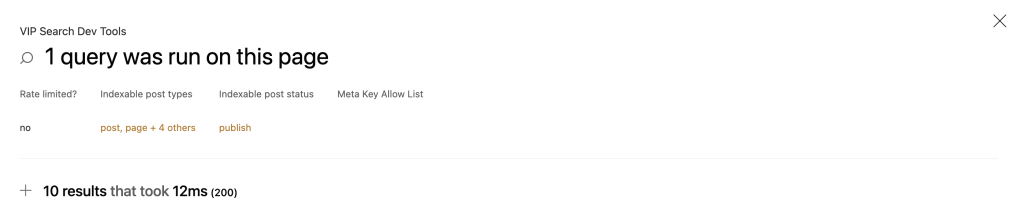
Each search status information type can be selected to reveal more details.
Queries
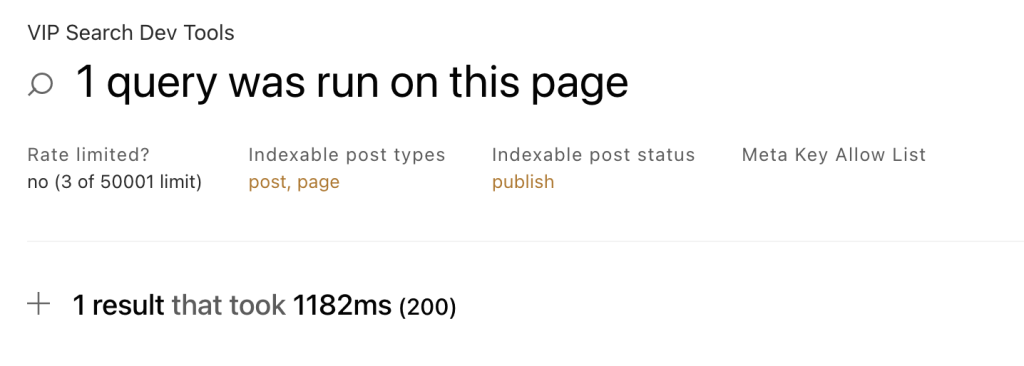
Each separate Elasticsearch query that was run on the current page can be inspected in detail by selecting the “+” figure to the left of the number of results returned.
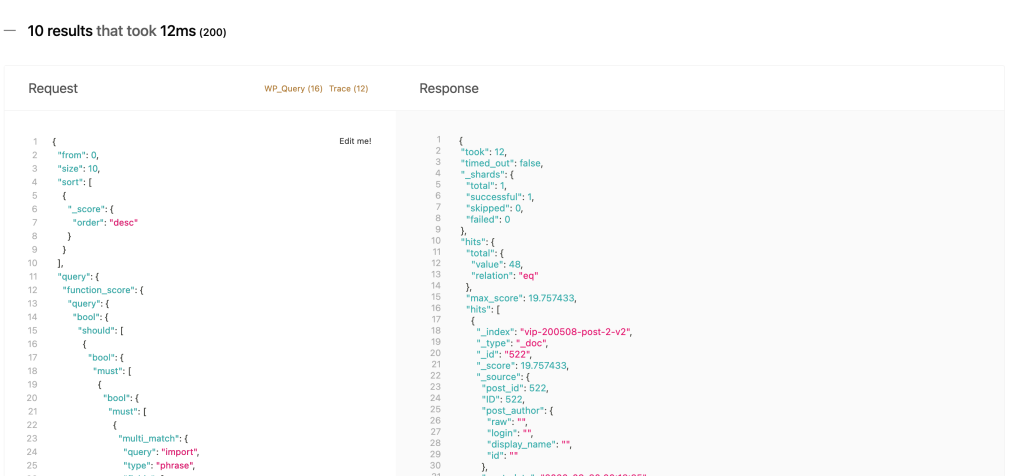
Once opened, the panel displays the request payload that was sent to Elasticsearch, and the response payload that Elasticsearch sent back.
If an item appears in the response JSON, but not in the page, verify that the item has not been filtered out of the results because the post has a non-public status (e.g., draft).
When search results are returned, that will be indicated and the response hits will contain those matches. The example screenshot above shows 48 results matching the import keyword.
Query context details
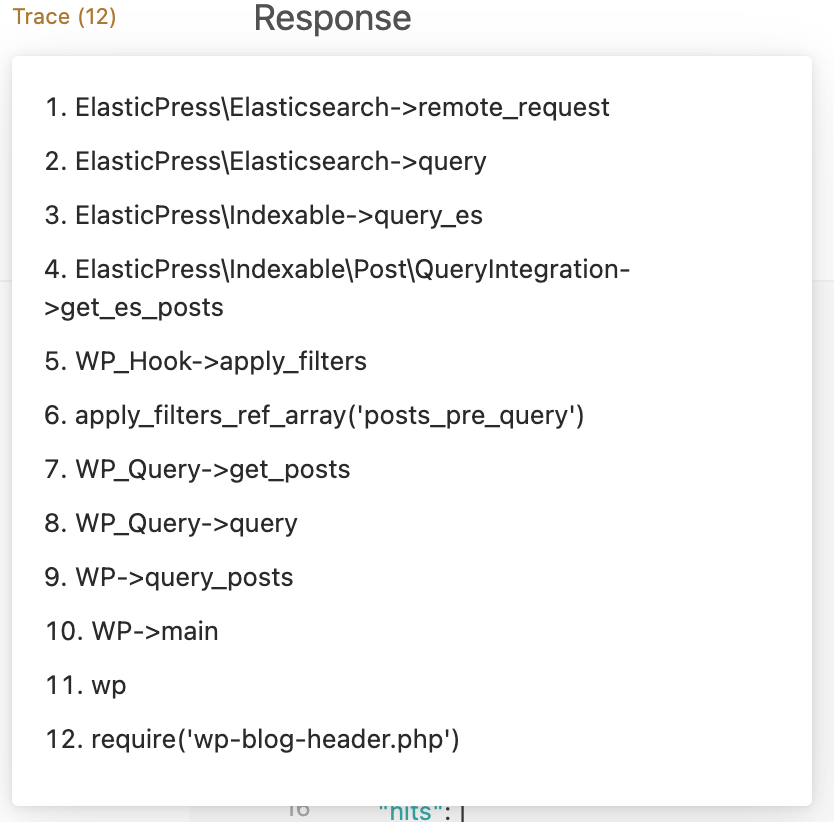
It is often useful to see the WP_Query object attributes and the stack trace in addition to the query request data.
Select the “WP_Query“and “Trace” headings at the top of the panel section to inspect object attributes and the stack traces of request data:

WP_Query provides the details of the WP_Query object just before the Elasticsearch request.
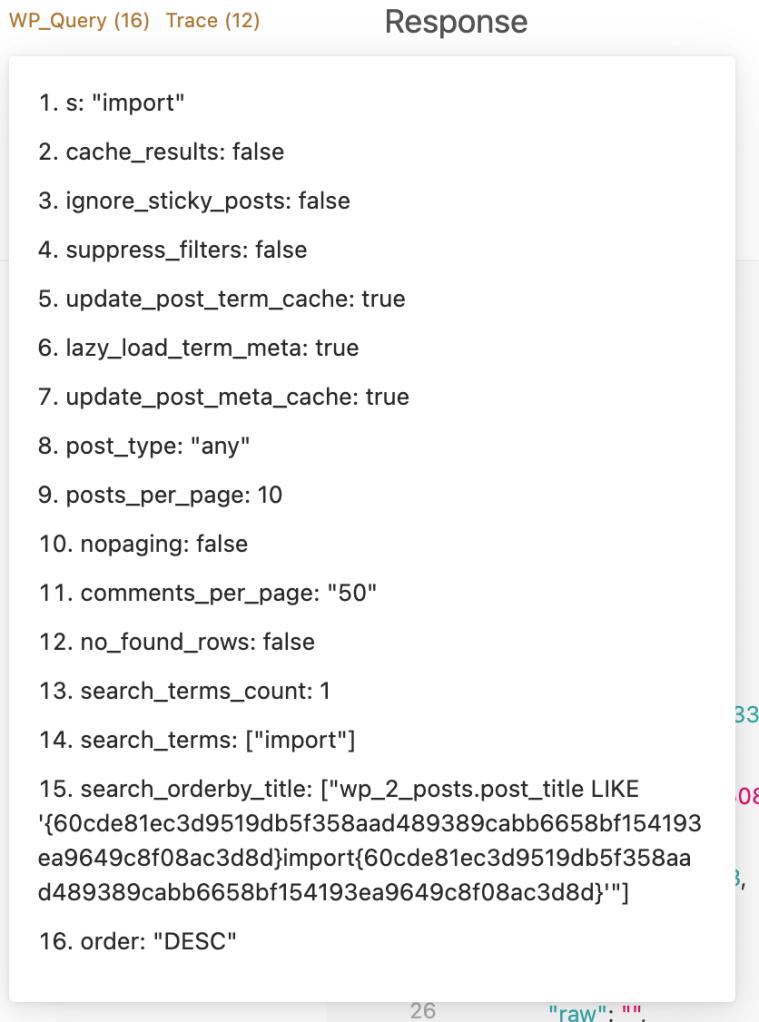
Trace provides a stack trace up to the point of the request. This is intended to provide insights into the functions that were involved in constructing the query, and which functions invoked the search.
Editing requests and testing changes
The request payload that was sent to Elasticsearch can be edited in the Request panel. Once modifications have been made to the request payload, buttons labeled “run” and “reset” will appear in the upper right.
Select run to update the Response area with an updated response payload based on the modifications made in Request.
Select reset to reset the panels back to the original unmodifiedJSON request and response.
Effects of modifications made to the Request and Response panels are limited to the Enterprise Search Dev Tools panel. They will have no effect on the rendered page of the site. This testing method is intended to provide a way to validate a possible query change before adding it to application code and modifying the WP_Query arguments, or a pre_get_posts filter, or another more advanced Elasticsearch filter.
As an example, the earlier example screenshot returned 48 matches for a search request. The sort order for the request can be updated from the default “desc” to “asc” in the Request panel. After making the modification, select run to display new results in the Response area, where the same 48 matches will be displayed but in the reverse order; the least relevant match is listed first.
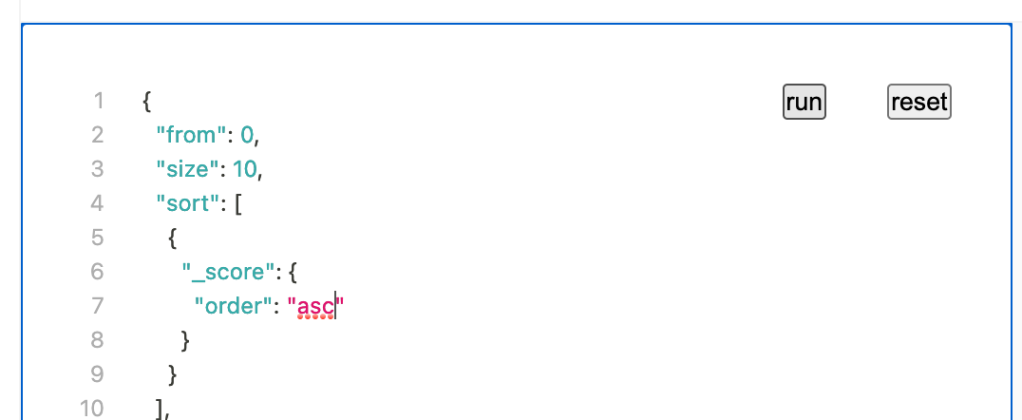
“desc” to “asc”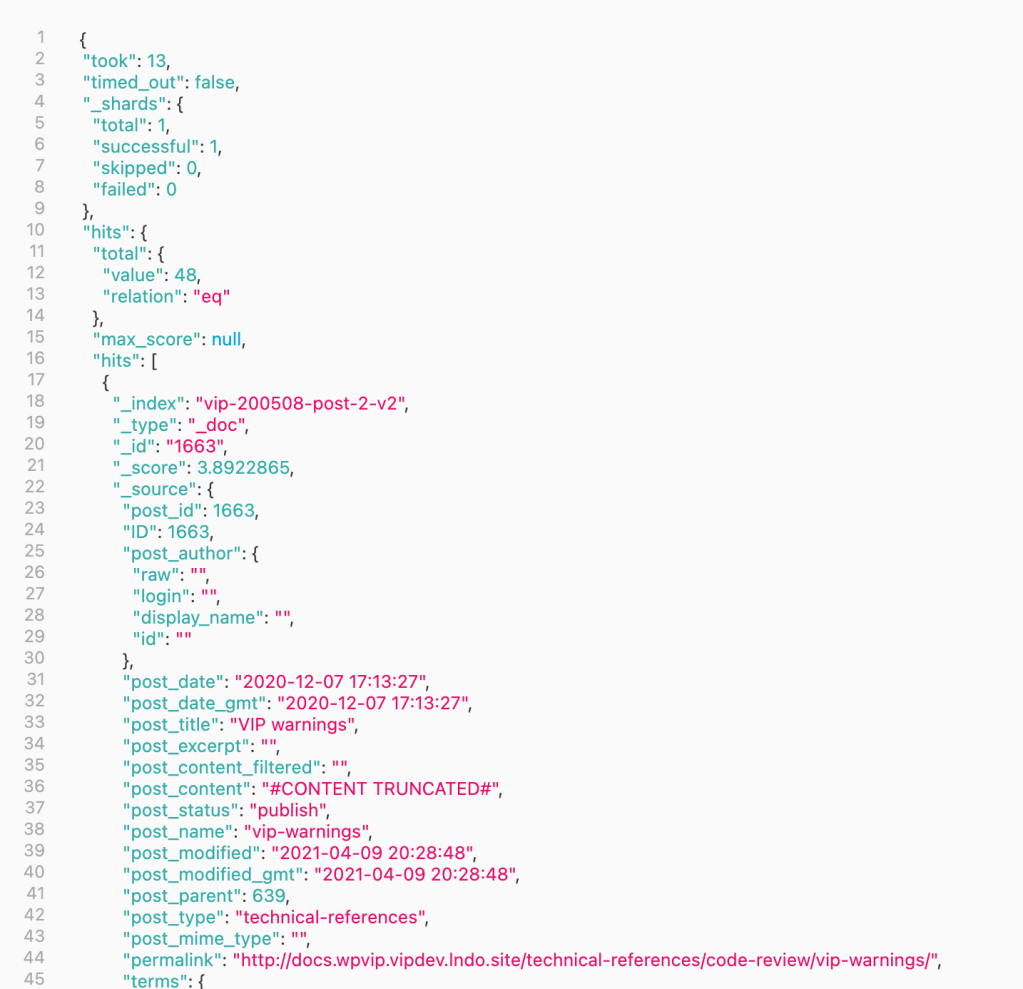
Troubleshooting
Verify that search is offloading to Enterprise Search
To verify if a site is properly offloading its search functionality to Enterprise Search:
- Search on the frontend of a site for a word that is included in one of the site’s posts (e.g., “example”).
- Select Enterprise Search Dev Tools from the WordPress admin tool bar.
- In the Enterprise Search Dev Tools panel, verify that the expected search term (e.g., “example”) appears in the request payload of the Request panel.
If the expected search term does not appear in the Request payload, search is not correctly offloading to Enterprise Search and more investigation is necessary to determine the root cause for the issue.

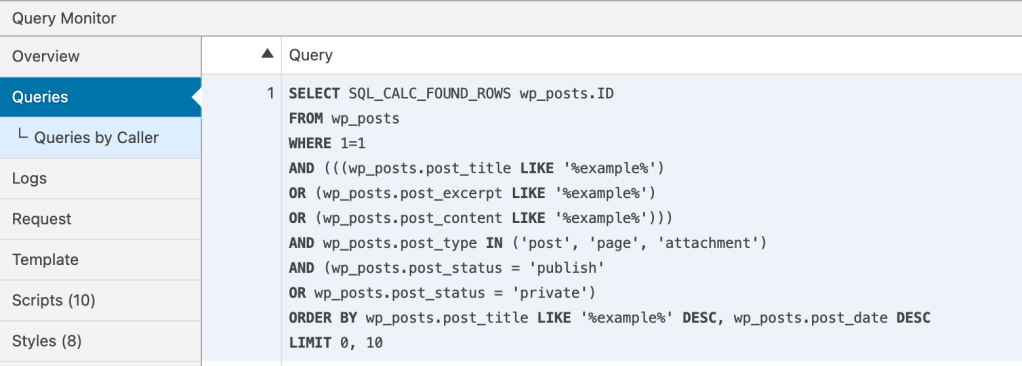
Query Monitor
If the expected search term does not appear in the Request payload, use Query Monitor to investigate further. Refer to the Queries panel in Query Monitor and look for a query similar to the one shown in the screenshot below. This type of query indicates that the site is still using Core WordPress search functionality and not Enterprise Search.
Object cache
If the query displayed in the Queries panel of Query Monitor does not indicate that the site is using Core WordPress search functionality, it is possible that the query is cached and object cache may need to be flushed. This action should be taken with great caution; flushing the object cache for a site experiencing high traffic can have negative effects on performance.
Example command for flushing object cache for a site:
vip @example-app.develop -- wp cache flush
index_not_found_exception
An index_not_found_exception error type in the Response area for a query indicates that a site’s index is missing.
{
  "error": {
    "root_cause": [
      {
        "type": "index_not_found_exception",
        "reason": "no such index [vip-200508-post-1]",
        "resource.type": "index_or_alias",
        "resource.id": "vip-200508-post-1",
        "index_uuid": "_na_",
        "index": "vip-200508-post-1"
      }
    ],
    "type": "index_not_found_exception",
    "reason": "no such index [vip-200508-post-1]",
    "resource.type": "index_or_alias",
    "resource.id": "vip-200508-post-1",
    "index_uuid": "_na_",
    "index": "vip-200508-post-1"
  },
  "status": 404
}
A missing index can also be verified with the wp vip-search health validate-counts command.
This command example command includes an output message that verifies that the index is missing:
$ wp vip-search health validate-counts
Skipping validation of 'post' index as it doesn't exist.
Create a new index to resolve the issue.
parsing_exception
An parsing_exceptionreason is field [post_date_gmt] is of type [indexed,tokenized], but only numeric types are supported. In the example output below, Elasticsearch detects that the first field of post_date_gmt does not have the proper mapping:
{
  "error": {
    "root_cause": [
      {
        "type": "parsing_exception",
        "reason": "field [post_date_gmt] is of type [indexed,tokenized], but only numeric types are supported.",
        "line": 1,
        "col": 1
      }
    ],
    "type": "search_phase_execution_exception",
    "reason": "all shards failed",
    "phase": "query",
    "grouped": true,
    "failed_shards": [
      {
        "shard": 0,
        "index": "vip-123-post-1",
        "node": "12345",
        "reason": {
          "type": "parsing_exception",
          "reason": "field [post_date_gmt] is of type [indexed,tokenized], but only numeric types are supported.",
          "line": 1,
          "col": 1
        }
      }
    ]
  },
  "status": 400
}
To resolve the issue and correctly map the index, use the index command with the --setup command option. For example:
$ wp vip-search index --setup
⚠️  You are about to run a destructive operation. Are you sure? [y/n] y
Indexing with setup option needs to delete Elasticsearch index first, are you sure you want to delete your Elasticsearch index? [y/n] y
Adding post mapping...
Success: Mapping sent
Indexing posts...
Processed 2/2. Last Object ID: 1
Number of posts indexed: 2
Total time elapsed: 0.184
Success: Done!
Last updated: May 26, 2025